It seemed like such a long journey to get to the point where all the parts of the crib were completed. Although it took a tremendous amount of handwork to sand every surface and edge of the crib so that it was smooth and would not present any sharp edges to my granddaughter it seemed that the time to sand, paint and assemble the crib was a relatively short period of time.
So here is the finished product. Unfortunately, the crib looks blue in this picture but it is actually white. My wife used a spray on lacquer to give the crib a smooth professional look. She bought the white lacquer at Home Depot it is Tremclad brand. Also, the lacquer is very hard and very durable. It is designed to take a lot of use and abuse.
Here you can see the correct color. It is a very clean looking white.
I used an attachment system where a nut is driven flush to the surface of the post in a pre-drilled hole. The components, the nuts and the bolts were purchased at Lee Valley. I glued together two pieces of maple to give a 1 1/2 inch thickness for the base of the mattress to sit on. I used 1 1/2 inches because any flex in the base would still be supported by the ends. After cutting the pieces to length I used a Forstner bit to create a clearance hold for the bolt to pass through the support and thread into the nut inside the post. This creates an extremely secure and strong joint that can be taken apart. The only improvement I would make is not to put the attachment hole so close to the side of the crib that it made it difficult to turn the bolt in and tighten it.
But all in all, there it is. I hope that it will contain my granddaughter for at least a few years. If she keeps growing at the current rate she may quickly outgrow it.
Showing posts with label design. Show all posts
Sunday, September 25, 2011
Monday, September 5, 2011
A BABY'S CRIB - PART SEVEN
Well, I managed to do what I did not think that I could do this long weekend. I assembled both sides of the crib. When you consider that my wife and I also attended a wedding ceremony on Saturday morning and a wedding reception on Saturday evening I am surprised that I finished both sides.
I thought that it was difficult cutting 56 mortises and 56 tenons. It was, but the difficulty was in the shear quantity of work. It was more a matter of repetition. Assembling 28 tenons into 28 mortises is yet another story. I have assembled mortises and tenons before but it was usually assembling a frame or assembling legs into a table or chair. Assembly all 28 verticals into the top and bottom took some thought and a lot of coordination, both physical and mental. One of the problems was that you have to work quickly. From the time you glue the first mortise and tenon until the glue the last mortise and tenon the glue of the first set must still be wet so that you push everything together for assembly.
Following my wife's suggestion I poured some glue into a little container then used a wide artist's brush to apply the glue. The brush allowed me to deliver the glue quickly and accurately without wasting glue of applying it where I did not want it. That method helped a lot. As you can see in the picture I used my table saw as a work surface. Of course it was unplugged and the blade was out of the way. I cover the top of the table saw with a sheet of plywood and covered the plywood with newspaper then I propped the frame up on pieces of 2X4. I put glue into the bottom rail then applied glue to each tenon of each vertical as I inserted it into the mortise. Then I applied glue to the top rail, applied glue to the tenons on top then assembled everything together. The trick is to get all the tenons and all the mortises lined up. Once you get to the point of lining everything up it is simply a matter of applying the clamps and tightening everything down. I glued one wide on Saturday between going the wedding ceremony and the wedding reception. I glued the second side today after dinner.
I would say that I have broken the elephant's back. the biggest parts of the project are done. Now it is trimming, rounding all the edges, drilling holes for assembly and painting.
The worst is behind me!
Wednesday, August 31, 2011
A BABY'S CRIB - PART FIVE
Just so that everyone knows, I have not spent all of my spare time going to science and art museums. I have spent a fair amount of time on the baby's crib that I am building. Actually, there is quite a bit of work done on the crib. I will just cover the first part of the work that I did on the two ends of the crib. After I finished planing all the boards I selected the boards that I wanted to use to make the ends. It was important that the boards that I was going to use for the posts had to be as straight and as true as possible. Since I had planed all of the boards myself the boards were straight. You can see here that I have one end assembled and one end in exploded view so that you can see all the parts and where they go. It was tricky gluing everything together. It took all of the clamps that I have. I even went out and bought a few more C-clamps because I did not have enough.
After getting everything glued together i was delighted that the two ends of the crib were straight and true. All the angles were square and there was no twist.
With the two ends of the crib completed. I spent all of my time working on the two sides of the crib. That will be for the next post.
After getting everything glued together i was delighted that the two ends of the crib were straight and true. All the angles were square and there was no twist.
With the two ends of the crib completed. I spent all of my time working on the two sides of the crib. That will be for the next post.
Friday, July 22, 2011
A BABY'S CRIB
Now that my granddaughter is over a month old it is time to get going on the baby's crib. Apparently she likes the cradle that I made for her. She hasn't told me directly but my daughter has told me that the baby sleeps quite well in the cradle. I am happy to hear that. the challenge will be to design and build a crib that is as satisfactory as the cradle.
A crib poses a few more challenges and restrictions than a cradle. In the first two or three months of life a baby does not move so much that design and safety considerations are important. As long as the cradle is strong enough and sways easily back and forth, that is sufficient. Other than that, the cradle should also be attractive. I think I was successful on all counts.
A crib is different. The baby is usually three months old or older before it sleeps in a crib. By that time the baby is more mobile and usually heavier, between fifteen to twenty pounds. There are some stringent CSA requirements that restrict design and construction of a crib. I have been mindful to incorporate all of these requirements. I want the crib that I create to be as safe and as strong as any commercial crib that could be purchased on the market.
In the design I created, I made sure that I incorporated all of the recommendations and requirements from the CSA. Actually, in most cases I went beyond their requirements. For instance, the spacing of slats is supposed to be no more than 2.38 inches . I decided to make the spacing 2 inches. It is simpler to measure and it will be a stronger frame. There is another requirement that the side cannot be raised or lowered unless there are two discrete movements incorporated into the action of raising or lowering the side. In my design the sides do not move. The base for the mattress can be raised and lowered by removing four fasteners that thread into a threaded nut in each post. The fasteners hold the frame for the mattress in place. I designed it so that it can hold at least 200 pounds of static weight. That might seem like a lot but a small child can exert a lot of force on the bottom of a crib. It is the dynamic force that a child creates that I am more concerned about. In the end, my goal is that my granddaughter has a safe place to sleep while she is still an infant.
This is a sketch of what the front of the crib will look like with a few dimensions. The sketch does not show well so I will talk more about it in my next post. The crib appears to be square which is not how I drew it. The crib will measure 53 inches long by 30 inches wide. It is more of a rectangle than a square.
This is a better picture of the front view of the crib than then one I tried to scan the other day. For whatever reason, scanning the sketch changed the proportions of my sketch. Instead, I took a picture of my sketches instead. The pictures are not perfect but the proportions are correct.
I will update everyone as I progress. Right now I am rushing to get everything in place for the baby shower this weekend. I have new floors in place and between now and Sunday I want to have new newel posts and railings in place. With luck, I should be able to get all of this done!
Tuesday, May 31, 2011
Baby Cradle Update #6 (Final update!)
As I said in my last post about the baby cradle I was handing the cradle over to my wife for painting and finishing. Unfortunately, I do not have pictures of the intermediate stages. We were busy getting ready for our vacation the first part of May. I am writing a series of posts on our vacation in Europe, WHAT WE DID ON OUR VACATION: AMSTERDAM.
At any rate, the cradle is in position in the nursery in my daughter's home. This passed weekend my wife and I visited our daughter and I took a few pictures of the cradle. I must say that it looks like it belongs in the nursery. My wife did an outstanding job in painting the cradle and creating the bedding and padding around the cradle.
It took several coats of paint to make sure that there is adequate coverage. The first coat was a primer coat. after the primer had completely dried my wife gave the cradle two good coats of a good quality oil based paint. She used an oil based paint after discussing it with the paint provider. she was advised that the oil based paint would provided the best coverage, have the best looking finish and it would be the most durable paint.
The only problem with an oil based paint is the odor after the paint is applied. That is one of the reasons that we wanted to complete the cradle as quickly as possible. If the paint has time to dry and cure thoroughly, the odor will completely disappear. When I took these pictures this passed Sunday, there was no evidence of paint odor in the room. When the baby arrives in a few weeks there will be no issue with paint odor on the cradle.
Now that the cradle is done I have focused my attention on completing the change table and the crib!
Thursday, April 28, 2011
Baby Cradle Update #5
It is a great feeling to be very close to the end of project that took much longer than you had originally thought it would take. I have finished all the parts of the cradle and put it together. It is interesting to note that the manufacture of the two simple wooden washers took almost as much time as some of the other aspects of the project.
I decided to manufacture the washers out of a left over piece of ash that I had used to make a small table several years ago that now sits in my office. It is extremely hard wood and will stand up for many decades without any wear. I cut the wood to size then carved each piece into a rough circle. It did not matter that they were perfectly round because no one is ever going to see them once they are in place. I sanded the washers as smooth as possible then applied cabinet makers wax to reduce any friction that there might be on the surface. In the picture above you can see that the washers fit nicely on the doweling that I used to tie the cradle to the frame. The washers will sit on the dowel between the cradle and the frame. The idea is to make sure that the cradle never comes in contact with the frame.
Everything is nicely sanded. The next step was to drill the holes on each end through the frame and the cradle then attach the dowel, the washer and the cradle to the frame. It sounded easy but it was tricky holding all the pieces together while I lined up the dowel with the cradle, the washer and the frame. But I finally figures it out and got everything together in the right order. Here is what it looks like.
The cradle swings nicely in the frame. It was a good idea that I waxed the dowel and the washer. The cradle seems to swing back and forth without any resistance at all. To make sure the dowel did not move I drilled a hole through the frame and through the middle of the dowel to hold it in place. Afterwords, I covered up the hole with wood filler.
All that remains now is to paint the cradle and frame. That part of the project I am giving over to my wife who does a much better job of painting than I do. So, the next post that you will see on the baby cradle will be the last one showing the freshly painted and complete cradle. I have to say that I am happy with the end result. It has turned out better than I thought it would.
Sunday, April 10, 2011
Baby Cradle : Update #4
The cradle is complete, at least the construction of the cradle is complete. It took a bit of thinking and a bit of trial and error to get the correct angle for the support of the bottom of the cradle. In the end, I used a protractor to measure the angle of the side of the cradle then I adjusted my table saw to that angle. I tried a few test cuts on some scrap wood and fine tuned the angle.
Once I got the angle right it was just a matter of cutting the supports to length and gluing them into place. I had to do it in two stages because I do not have enough clamps to glue all four sides at one time. So I glued the ends on Saturday morning then glued the sides on Saturday night after the glue on the ends had cured during the day.
Once the supports were fully cured I put two wood screws in each end and three wood screws along each side. The glue alone should be enough to hold the supports in place but I always feel better if there is mechanical attachment as well. All that remained was to cut the bottom of the cradle to size, glue in place then hold everything together with half inch finishing nails; to hold everything together until the glue dried and cured and to add a bit of mechanical attachment as well.
I thought it would be a good idea to see how the cradle looks in the actual nursery where it will be located so I took it to my daughter's house tonight and took these pictures in situ.I think it look pretty good. It will look even better when it is assembled to the stand and painted.
Saturday, April 2, 2011
Baby Cradle : Update #3
It is a great feeling when you get to a major milestone in a project. this afternoon I assembled the frame of the baby cradle. It was a momentous step for me. I have struggled with this project and getting the frame together was a major milestone.
I thought that it was trial to make sure that the stiles were straight and snug and they were. The biggest test was figuring out how I was going to drill the holes in the side of the ends of the cradle that were cut at 30 degrees. I could not use my drill press unless I made a jig to hold the ends at 90 degrees to the drill. I ruled that out because it would take longer to make the joi than it would to figure out another solution. In the end I used the holes that I drilled in the sides as pilot holes to drill the holes in the ends. It was tricky and difficult but I got everything drilled, glued and attached with wooden dowels. I clamped everything together even though I probably didn't need to. I just wanted all the joints to be as tight as possible.
The rest of the project will be relatively easy. I need to attach the bottom of the cradle then attach the cradle to the frame. There is still some final shaping and sanding of the sides and ends to make sure that there are no sharp edges anywhere but that is minor compared to the rest of the project. Oh, and I need to create a key to so that the cradle can be made stationary.
The end is near!
Monday, March 28, 2011
Baby's Cradle: Update #2
I find it interesting when I make something the second time. The learning that occurred the first time significantly decreases the amount of time that it takes to make the thing the second time. This is true of the second side of the baby cradle. I spent more time thinking about how I was going to make the first side then I actually did making it. No, that is not exactly true. The cutting and drilling and assembly did not take a long time. The sanding of the stiles that were on size for the holes seemed to take forever.
After completing the first side of the cradle I thought about how I could expedite the sanding process. My Manufacturing Engineering mentality kicked in. Sanding by hand is not efficient. I needed something that would speed up the turning of the spindle without causing me to suffer carpal tunnel pain! I thought of using my electric drill. This would be an improvement because it would spin the spindles much fast than I could by hand and I could simply hold the sand paper. The problem would be holding the drill . I would have to create a jig to hold it while I sanded each end. That seemed to be more trouble than it was worth.
I discussed the issue with my wife. She suggested that instead of using the drill, I could use my drill press. Brilliant idea! It goes to show that when someone looks at a problem with a fresh set of eyes and an unbiased point of view they can come up with a new and novel solution that was not obvious to me before because I constrained by the idea of a drill press as being something that just drill holes.
I tried out the drill press by marking the distance that goes into the hole,5/8 of and inch and inserted that length in the drill chuck and tightened it. When I took the spindle out of the chuck the marks that were left would be hidden inside the hole. I reinserted the spindle inside the chuck. When the spindle was held firmly inside the chuck I turned the machine on and held the 60 grit sandpaper against the marked out end of the spindle. I counted out 30 seconds and stopped. When I tried to put the spindle into the hole it slid down to the bottom of the hole with gentle pressure.
It was a good fit. It took me about two minutes to sand each spindle so that it would fit into the hole. That is less than half and hour for all twelve spindles. It took over half and hour to sand each spindle by hand, six hours in all to sand twelve spindles. That is over 90 percent improvement in efficiency!
With both sides done, it should be a relatively easy task to complete this project.
Saturday, March 26, 2011
Baby's Cradle : Update
I have finished one side of the cradle. It seemed easy enough in concept. The cliche, "the devil is in the details" was true enough.
It just looks like four pieces of wood with a bunch of round sticks placed evenly inside which is exactly what it is. It was the details that spun it into a long labored process. Cutting the frame to length and cutting the lap joints with my mitre jig was not difficult and did not take a lot of time.
The problem started when I drilled the 3/8 inch holes for the the 3/8 inch stiles. The fact that this might be a problem did not occur to me until I tried to fit the stiles into holes that that are the exact same diameter. They didn't fit. I had to sand each stile until I could just slide it into the drilled hole then assemble the entire frame and glue it all together. The sanding took hours.
Tomorrow I an going to start the other side of the cradle. I some ideas that might expedite the sanding but will have to see how effective the are. We will just have to see.
Sometimes we just fail to see the forest for the trees, another cliche but in this case, true.
Saturday, March 19, 2011
Baby's Cradle
I have been remiss in posting these last few weeks. It has been unavoidable. The last week of February I was preparing for a trip to China. I spent the first week or so in China. Last week I was so swamped with work and trying to re-adjust to being in our time zone that I have not had time for posting. While I was in China I had no access to the blog site. China blocks most social networking sites. Why that is would be a whole series of posts so leave that for another time.
Before i went to China I had been working on a cradle that I am making for my youngest daughter who is due in June of this year. I wanted to make something for my first grand child so I offered to make a cradle as well as the crib. Strange as it may sound, the cradle is considerably more complex than the crib will be.
I wanted to get as much done before I left for China so that I would need fell that I was behind while I was away. I had glued up the bottom supports for the stiles that hold up the cradle.
So that is where I am today. The stand for the cradle is glued together and I am working on the sides for the cradle itself. Hopefully that will be done within the next week and and I can assemble the cradle. One that is done it will just be a matter of sanding, painting and assembling the cradle to the stand. I hope to have this done by the end of March.
I would like to write a series of posts about China. I think that I have a few interesting things to say about that subject but that will have to wait until the next post which will be a lot sooner than the last one.
Before i went to China I had been working on a cradle that I am making for my youngest daughter who is due in June of this year. I wanted to make something for my first grand child so I offered to make a cradle as well as the crib. Strange as it may sound, the cradle is considerably more complex than the crib will be.
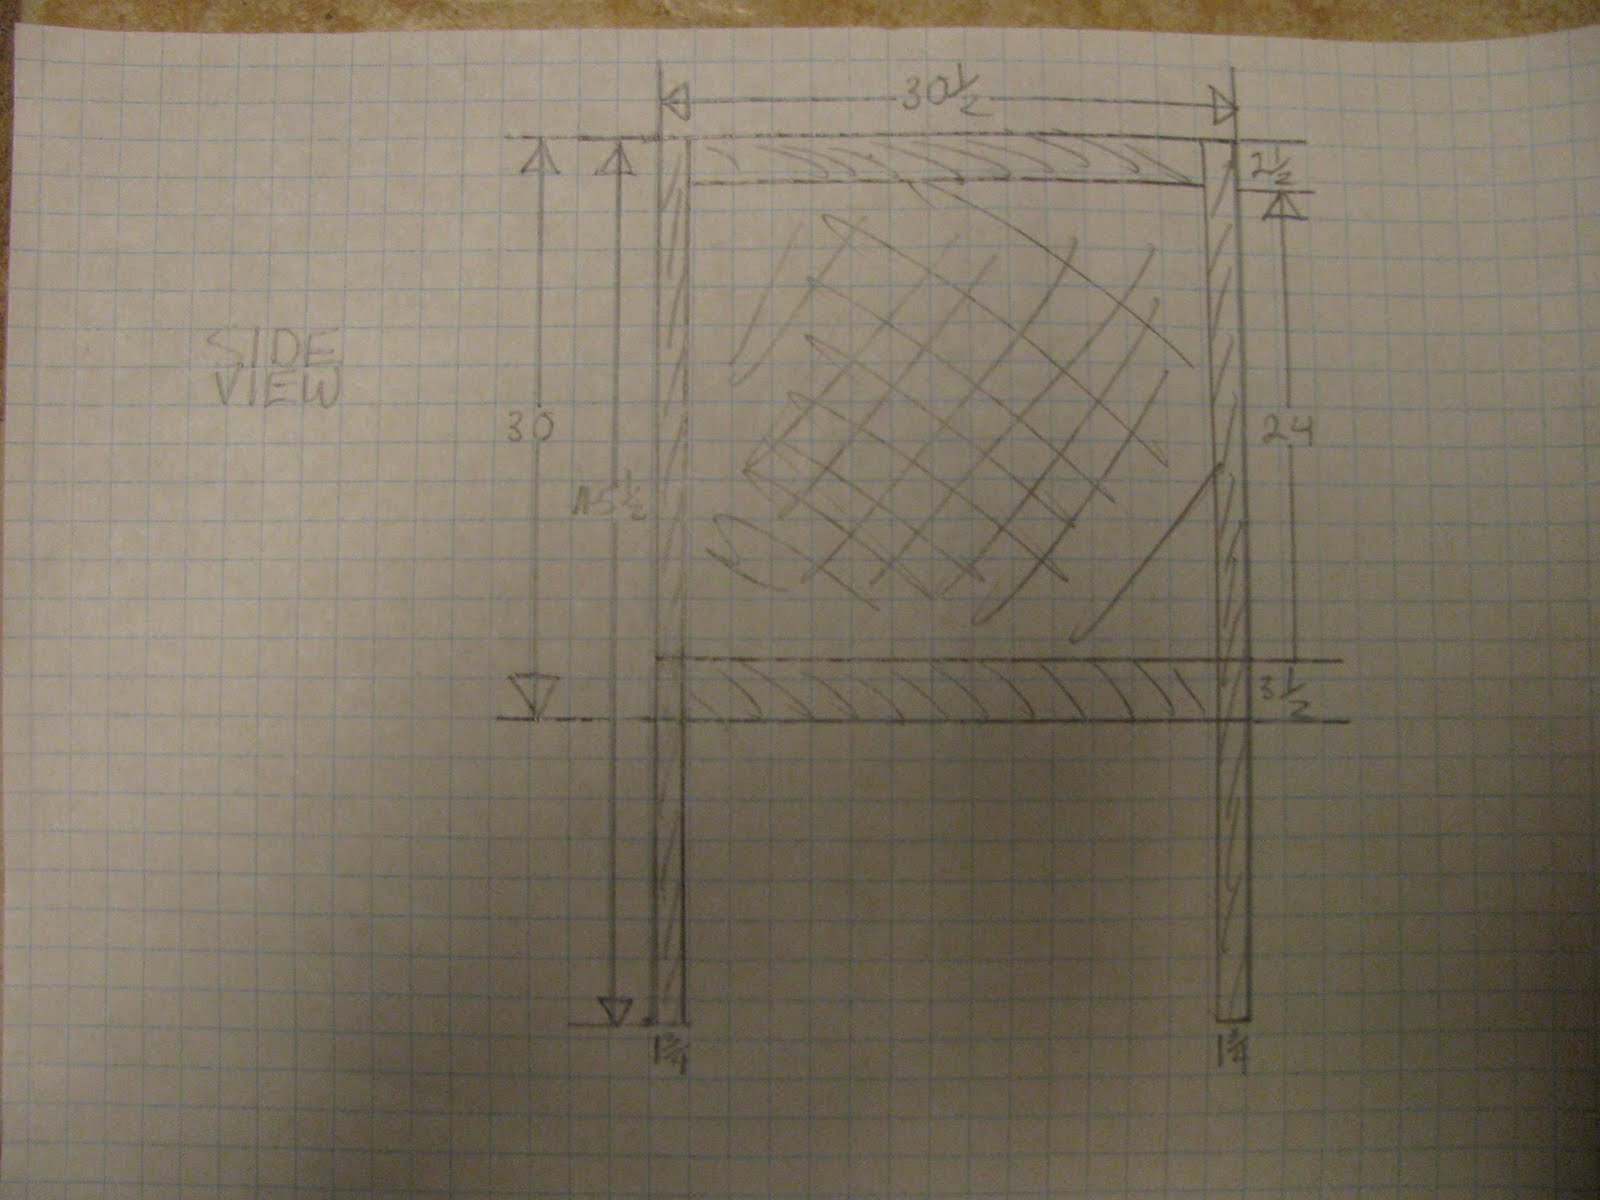
The plans that I bought were for an old fashioned cradle but my daughter did not like the design so my wife and I changed it to suit my daughter's taste so the finished product will look significantly different that this picture. The plans are good for giving general dimensions and the attachment of the joints. Other than that, everything else is different.
The joints for the stiles and the base are mortise and tenon joints but I do not have a mortise jig so I cut the mortise into the two halves of the base then glued them together. I could cut the tenons using the tenoning jig that I had made for the kitchen doors that I made for our kitchen.
Once I had the base glued together and the tenons cut I made a dry fit to see how the cradle supports and the base went together.
To my relief they went together nicely.
I also cut out the ends for the cradle and cut up the pieces for one side.
Unfortunately, that is about as far as I got before I left for China. The project was on my mind while I was away so I worked on it last Monday, the day after I returned from China. I finished all the pieces for the stand, then pinned and glued everything together.
So that is where I am today. The stand for the cradle is glued together and I am working on the sides for the cradle itself. Hopefully that will be done within the next week and and I can assemble the cradle. One that is done it will just be a matter of sanding, painting and assembling the cradle to the stand. I hope to have this done by the end of March.
I would like to write a series of posts about China. I think that I have a few interesting things to say about that subject but that will have to wait until the next post which will be a lot sooner than the last one.
Subscribe to:
Posts (Atom)