Sunday, January 30, 2011

THE HAMILTON WOODWORKING SHOW


This weekend is the sixteenth Annual Hamilton Wood Show http://www.hamiltonshows.com/Wood-Show.php which is held at the Canadian Warplane Heritage Museum,http://www.warplane.com/ . I only attended on Saturday, January 29th.

You must walk through the warplane museum to get to the wood show, I snapped a few pictures of these antique planes. from a historical point of view, they are interesting to look at. It is amazing that pilots flew these machines and fought battles in the air!

There were more booths and exhibitors that I can possibly list in this post. I felt a bit like a kid in a candy shop. Although my main interest is wood carving and sculpture I also do woodworking so I was keenly interested in all of the new woodworking tools that were shown at the wood show for the first time. The next time that I am in the market for a new power tool which is whenever the money or the space will allow, I will be purchasing it at the wood show. The discounts that sellers were offering at the wood show were amazing; $100 to $200 off on $800 power tool.
As I said, my main interest is wood carving so I was really interested in seeing the entries and winners on the Canadian Woodcarving Championships. The best in the open class and I think the best in the entire show was the piece below, called Weed Man by Fred Zavadil, http://www.fredzavadilwoodcarving.com/ . It is truly a wonderful work of art and deserved the first place win.
 There were so many entries that I restricted my pictures and the mentions in this blog to ones that I truly liked and interested me. the piece below was an excellent entry, it won best in class for the novice class. It is really good for a beginner.

I thought this assembly of caricatures was hilarious. It is called Chicago Gangsters and it portrays the illegal activities of the mob in Chicago circus 1950. The seated character is holding a Tommy gun while the other two characters are busy working a printing press. Probably printing counterfeit money.

 I also like the several examples of Native art as well. They were very well done and were good examples of native art.

 There were several figure carvings that I like so I show them in the next few pictures. They show good design and execution.

I could not help taking this picture. Piet Mondrian is well known for his geometric designs. There are many stained glass artists who have used his ideas in stained glass windows. http://en.wikipedia.org/wiki/Piet_Mondrian
 I stopped to speak with Neil Cox who is a carver and a sculptor. I was very  impressed with the piece that he had with him. He was also working on a new carving as well. It was very original and well conceived in design. You can see more of Neil's work on his website, http://www.zaleski.ca/neilz_c/ .Neil did not enter this carving into the competition because he was one of the judges.


Needless to say, I thoroughly enjoyed myself at the 16th Hamilton wood Show. It was entertaining and inspiring. I met lots of people and it acted as an inspiration for me to work harder at carving and sculpting wood. I think that I will even submit one of my pieces for the woodcarving championships next year.


Thursday, January 27, 2011

Notes From the Road

I am always amazed at how little time I have when I am on the road. The few days I have been in Iowa, USA visiting clients. I always feel that I will have lots of free time to muse and write and generally be creative. It did work out that way and it never seems to work out that way. Time is spent checking into hotels, settling into hotel rooms, finding places to eat, setting up computers to get internet access which should never be taken for granted, and so on and so on. If you are lucky, you might find some time to spend in the pool or exercise room.

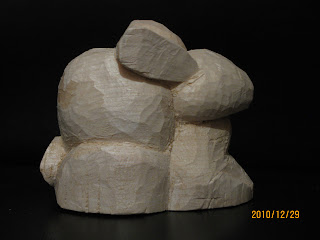
Most of my time was consumed either being with my clients or preparing for meetings with them. Last night, I had planned to spend time working on my rabbit piece that I had brought with me. I brought it because I like to have something to work on when I am on the road. As everyone who has labored through the last couple of blogs will know, sanding is a long and tedious job. I brought two grades of sandpaper with me but I only managed to get through one of them, the 100 grade paper. Yes, it did push the work a little closer to completion but I had planned to complete the 100 and 120 grades of sanding. At any rate, that did not happen.

Last night, as it happens, I took one of clients to dinner. A friend of his had recently opened a Chinese buffet restaurant in Cedar Rapids, Iowa and he wanted to try it. So off we went to Cedar Rapids, my client drove because he knew the way. All in all, it was a good time. we enjoyed a meal together. We had a few drinks together, at least I did since my client drove. I had scotch, in honor of Bobbie Burns birthday which is on January 25th for those who might not know. I improved my relationship with my client so in the end it was a reasonable trade off in time that I might have spent completing one more sanding of the rabbit. The work will still be there when I get home but the client will be here in Iowa with his memories of the dinner we shared. Hopefully, that will have a favorable bearing on our future work together.

I must end this here because I have one more visit to make before I catch my flight later this afternoon. I will not get into Buffalo until almost midnight so it is going to be a long day. I just wanted to dash off a few lines when I could. I guess that is what life is like on the road.

Sunday, January 23, 2011

AND SO THE SANDING GOES, OR PATIENCE IS A VIRTUE.

It has been a week and there does not seem to be a lot a change in the rabbit. This is the problem with finishing a piece, it takes time. So many people who work in wood despise this stage of the process for this very reason, it is slow and tedious. However, this is the stage that can make a carving into a superior finished piece or it be a piece that features all of the imperfections that were accumulated during the carving stage of the process.


Last week I sanded out all of the carving marks with 60 grit sandpaper. This week I used 80 grit cloth backed paper to remove all of the marks left by the 60 grit paper. But in the process I also found some the imperfections that the 60 grit did not remove. It took extra time with the 80 grit to get them out. Well, you see what I mean, it is a long process. The temptation is to rush and circumvent the process and skip ahead to the end. That would be a mistake. I still have at least three or four more grades of increasingly fine sandpaper to work through.

Actually, it is boring to even write about this so until I finish this process, I am not going to spend a lot of time writing about it. Take a look at the pictures of the rabbit after sanding and after wetting it. I am going to try and work through the rest of the grades over the next week or so.


I have other projects on the go as well. I find that it is better to have several projects at different stages of completion at one time. For instance, There are projects that have sitting on the shelf for years that I have not finished. Some of them I left because I became interested in other ideas and others I left because I did not know how to finish them or I could not make up my mind on how to finish them. At any rate, t I am in the process of finishing many of those older projects. 

I am also working on several new projects. I have an idea to create three nutcrackers for Christmas this year. My daughter, Nicole, bought a book on nutcrackers that is published by the Leavenworth Nutcracker museum. It is even signed by Arlene Wagner who is the author as well as the curator of the museum. I have been reading this book and looking at the pictures and thinking about how I want to approach this subject. I want to preserve the idea of a nutcracker but I want to take it in a different direction. http://www.nutcrackermuseum.com/. The book itself can be purchased from the museum or you can purchase on Amazon as well, http://www.amazon.com/Art-Character-Nutcrackers/dp/1933112085.

Actually, I have so many ideas for new projects that I have to seriously think about which ones I want to tackle next. Over the next several weeks I will write about some of the other projects that I am working on. There is lots to write about so I will need to organize my thoughts to make this somewhat coherent.

Sunday, January 16, 2011

Sanding and Finishing a Rabbit and Mark Lindquist

Last week, I finished carving the rabbit that I am going to use for our newel post on our new staircase. A lot of carvers put tremendous energy and enthusiasm into the carving of their pieces but little or no effort into the finishing of their pieces. Many are disappointed that the final piece does not look as good as they thought it would or should. I learned some time ago that the finishing of a piece is as important at the actual carving of the piece. In fact, I can put as much effort and care into the finishing of a piece as I put into the carving of it.

One if the people who had the greatest influence over me regarding finishing carvings was Mark Lindquist in his book, "Sculpting Wood". 

"RAISING THE GRAIN
Machining and sanding damage the outermost layer of cells of the surface of wood. Sanding also pushes the cells over and causes them to lie flat, producing the cells a seemingly smooth surface, like grass after being rolled with a lawn roller. If left the way, however, these cells fragments may eventually raise up, making the surface of the wood rough. The first step in finishing after sanding, therefore, is the raise the grain.
Wetting the wood with a warm damp rag makes the cell fragments stand up. The wood is the allowed to dry, either naturally of by rotating it in front of a light bulb. The surface of the wood again becomes rough. A very light sanding with the final grit sandpaper will remove these damaged cells without disturbing the sanded surface." p 133.

The four pictures below show the rabbit after the first sanding. I used 60 grit sand paper. I don't usually use 60 grit but i have an entire roll of it that I purchased for a woodworking project that I did not use it for. So I want to use it up. I found that the 60 grit quickly removed all the carving marks but i had to be careful not to sand it too much or I could easily remove the very shape that I had carved.


 These second set of pictures show the rabbit after I wetted it with a micro fiber cloth. I like the micro fiber cloth because it also removes any look bits of saw dust that might be stuck in any of the crevices. To get at the spots that the cloth could not reach I gave the rabbit a quick rinse on the tap using warm water.

The first time that I did this, rinse a carving under water, I was at my wood carving guild and I thought that some of the older members were going to fall off the stools. They thought I had lost my mind. Whey they saw the result, that the grain was nicely raised and ready for the next sanding they were less skeptical but none of them were going to try it.


Now, I am going to leave the rabbit to dry for a few days until it ready for the next sanding. I will continue this process, going up in grits of sandpaper until I feel that it is sufficiently smooth for the top of a newel post, probably around 200 to 300 grit. And yes, I will wet the rabbit after each sanding to raise the grain. This was only the first lesson that I learned from Mark Lindquist.

I will be really interested to see what it looks like after the next sanding. The grain of the wood should start to show.

See you then.

Saturday, January 8, 2011

A New Year


Well, it is a new year; 2011. What does everyone do for the new year? They make resolutions that they never keep. I stopped making resolutions years ago, at least ones that I knew I would never keep.

What I resolved to do this year is to post a blog at least once a week. I heard that posting a blog once a week is the minimum that is expected of any blogger. I might do more than that but I am sure that I can do at least one blog a week no matter what I am doing or where I might be in the world. I should be able to honor that commitment.

Secondly, I resolve to carve every day that I possibly can. There will be days that it will be impossible or impractical to carve but when I can, I will. Because of an injury, I could not carve for almost a year. It was very frustrating. Right now, I have so many ideas and so much motivation that I could carve twelve hours a day. I know that is not possible but that is the feeling that I have.


Thirdly, I resolve to complete some of the projects that I have in process. Some of the pieces that are unfinished have been sitting on a shelf for three, maybe four years. It is about time that I finished those pieces. Besides, they will give me plenty of things to talk about in my blog and make it really easy to carve everyday.

For instance,  The pictures below are of the rabbit that I started before I the three Christmas figures that I made for my children. This was before I started this blog so I do not have pictures of the initial stages fo the carving. This is where I left it off before Christmas.


Now that Christmas is over and I have finished those carvings I can get back to the rabbit. The rabbit is intended to be the top of the newel post of our new staircase that leads from the side door entrance to the first floor of the house. The staircase is not there yet but I want to get ahead of the curve and have the rabbit done before hand. It will also give me an idea of what the rest of the staircase might look like.Why a rabbit, you might ask. Because we live so close to nature I like to incorporate animal themes whenever I can.

You can see from the picture that I have one ear roughed out and the rest of the rabbit looks pretty rough as well.


You can see in this second set of pictures that the ears are done, the nose is roughed out and I have drawn in where the eyes will go. Because this will be the top of a newel post i decided that I did not want too much detail so it is more stylized than realistic. 


The last step has been to rough out the eyes. You will notice that the eyes are closed. I thought that is would be better if the rabbit appeared to be sleeping on top of the newel post instead of looking like it was going to leap out the door as soon as it was opened!

Now, the step will be to sand it and finish it but that will be in the next post.


Saturday, January 1, 2011

Nicole's Carvings

I started my first post with a picture of the three figures that I made, one for each of my three children. Since I am visiting my oldest daughter at Christmas, she pointed out all the pieces that I have carved for her over the years.

The cat below is the piece that I carved for her. Actually, it was one of the first pieces that I ever carved. The very first piece that I ever carved was a letter 'A' which I carved with a straight chisel. It took me three weeks to carve that letter! I still have the block, I keep it at the bottom of my tool box where I keep all the blocks for sharpening my knives and chisels. I kept it as a measure of my first accomplishment in wood carving. We always need to remind ourselves of where we began, especially when we get discouraged or frustrated.

When I attempted carving the cat it was a bit of a leap going from carving a letter in more or less a two dimensional design to carving a figure in three dimensions or as wood carvers are fond of saying, carving in the round. it does not seem like a huge difference but in reality it is a totally different way of visualizing the piece that you would like to carve. I found that I had to constantly see the finished piece in my mind as I was working on it. When I did that it was easy to decide how I would go about removing wood to arrive at the finished piece, the cat that I made for my daughter. It was not a perfect piece but I was happy with the result and my daughter was also happy with it.


The little mouse that you see here was a piece that I saw a member of the carving club make during on a hour or so. I was so taken with the little guy that I decided to make one for my daughter to go with her cat. I followed a pattern that I got from one of the members of the carving club for the first mouse but I made all the others from memory. Consequently, each mouse is slightly different than the last one. I like that because each one is distinctly different from the others. I also gave a mouse to a friend of mine in China during the year of the mouse. He thought is was a cute little gift.


This little guy is something totally different. He was part of the group of carvings that I did for Christmas several years ago. My wife and I wanted to give something special to our children at Christmas. We decided that we would create a group of whimsical Father Christmas type figures. I carved four figures. We gave one figure to each one of our children and we kept one for ourselves. I carved each figure from piece of recycled wood from our house. We have been renovating our home for the passed decade, one room at a time. I have kept some of the wood because the wood is well over fifty years old. From a wood carvers point of view, the older the wood the more seasoned it is and usually, the easier it is to carve. The wood that I used for these pieces was cedar that measured approximately two inches by two inches and measured eighteen inches long. The interesting thing about cedar is that when you cut into it the resin in the wood is released and you can smell the cedar fragrance. As I carved these pieces, the fragrance reminded me of Christmas. It was a pleasant experience. The down side was that the cedar had a tendency to splinter which made me more careful in how I cut into the wood. When I finished carving the pieces, I handed them over to my wife who used her imagination and ingenuity to come up with the finished product. These pieces were our first collaboration in carving and painting.


This last piece was part of another series of Christmas tree ornaments that I did. In fact, I still make a few of these every years because they seem to be popular with my children and they take as many as I can carve. Like other pieces I carve, I saw the original idea in a wood carving magazine, Wood Carving Illustrated, I believe. After the first piece that I carved I developed the idea into an original set of Santa Claus heads that my family hang on their Christmas trees every year.

That is all of my pieces that my daughter has in her house. I will have to think about what I might do for next Christmas. Right now, I am thinking that I would like to make Nutcrackers for next Christmas. I still need to research the idea and develop a design for three or four Nutcrackers that I would like to make for next Christmas.

This is the first day of 2011 and I hope that everyone will have a healthy and prosperous year!